Why you still need the Real Thing Fingerprinting
Merit Badge
Requirements: 1. Give a short history of fingerprinting. Tell the difference between civil and criminal identification. 2. Explain the difference between the automated fingerprint identification systems (AFIS) now used by some law enforcement agencies and the biometric fingerprint systems used to control access to places like buildings, airports, and computer rooms. 3. Do the following:
4. Take a clear set of prints using ONE of the following methods.
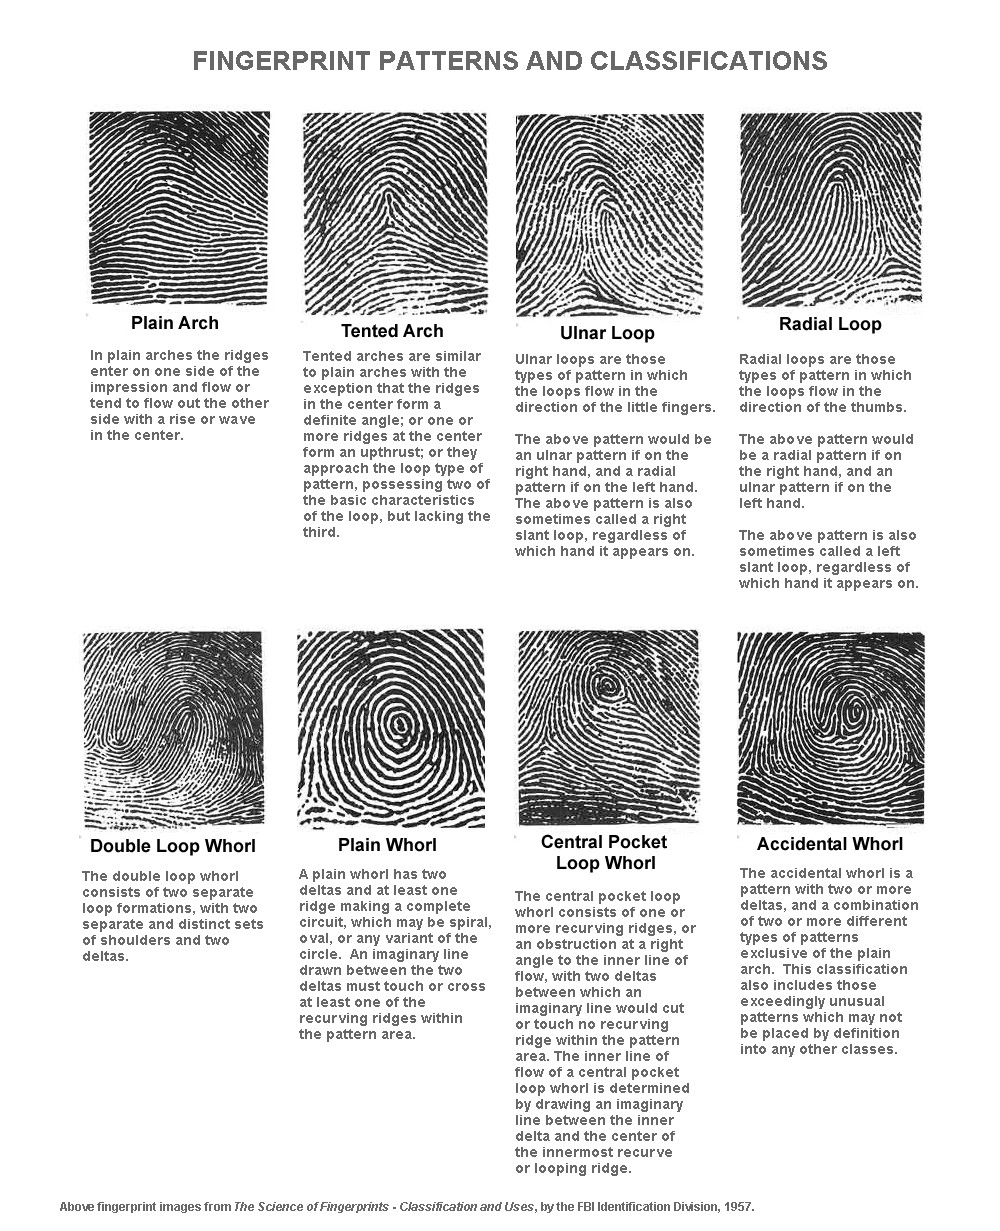
5. Show your merit badge counselor you can identify the three basic types of fingerprint patterns and their subcategories. Using your own hand, identify the types of patterns you see. Fingerprints form before birth and, except for cuts resulting in permanent scars and diseases such as leprosy, remain unchanged until the body decomposes after death. Fingerprint evidence is the most positive investigative means of identifying people. Even DNA blood analysis cannot differentiate between identical twins - fingerprints can. Every fingerprint is unique. Fingerprints are records of the raised surface of papillary skin, also called friction skin, appearing on the palmar side of a person's fingers. Papillary skin is present on the palmar surfaces of the hands and the plantar surfaces of the feet. These are skin surfaces on your fingers and hands which touch a drinking glass with when you pick it up, and the skin surfaces on your toes and bottoms of your feet which touch the ground when you walk barefoot. Palm, lower finger joint, sole and toe impressions are all unique. Almost any area of friction skin that can be covered with a pencil eraser is large enough to permit positive identification if recorded clearly and completely. Although many fingerprints have the same pattern type and look very similar, when examined closely the differences can prove that the prints have been made by different fingers. And the opposite may be true. Prints from the same finger may look different because the pressure used to make them differed. Or they may look different because the curve of the surface differed. Yet examination by a qualified examiner can prove the prints to have been made by the same finger. Positive identification or elimination of
fingerprints
can only be made by trained and qualified fingerprint examiners.
Examiners
identify prints by making the qualitative and quantitative comparisons
of one friction ridge print with another. They compare the separate
ridge
characteristics and their relationship one to another. They can do this
from impressions of any area of friction skin. Fingerprint records are maintained in government computerized databases in America. Civil fingerprint identification, such as occurs with police or soldiers entering into public service, is the recording of a person's fingerprints primarily for the purposes of:
Verifying the person's identity at a later date
Determining the person's true identity if they have used other names for previous arrests Determining the person's prior arrest/conviction record
Recording Inked PrintsFingerprints impressions taken directly from a person's fingers for the purpose of identification must be uniformly clear and visible. It is not hard to take good, clear fingerprints. A good fingerprint impression is dark gray in color and free of smudges. All that is needed to obtain good prints is practice.Have the subject sign the fingerprint card. It is not needed nor desired that you advise persons of their legal rights just to take their fingerprints. Have the subject wash his hands to remove any dirt particles. Make sure that the fingers are free of lint from the towels used to dry the hands. Gather your equipment together and ready it for printing. In addition to fingerprint cards, you will need--
The steps for inking fingers and the steps for making impressions on the card are the same. Each finger is rolled through the ink on the glass and then that finger impression is rolled on the fingerprint card. All rolling should be made in single movements. Do not roll back and forth. The pressure should be just enough to apply an even coat of ink on the finger and a clear image on the card. After the procedure is complete, fill in the
data on the
fingerprint card. Sign the card or paper for identification. This
signature
is important in legal proceedings. ROLLED IMPRESSIONSone-fourth inch below the first joint. They are made by rolling the finger or thumb from nail edge to nail edge. This surface gives all the needed ridge characteristics for correct classification. (Classification is the means by which a set of fingerprints may be filed and then retrieved in the future.)There is a specific means of rolling the subject's fingers or thumbs in the ink and on the fingerprint card to give a good impression. You roll the fingers or thumbs from "awkward to comfortable." To see what is meant, hold your hands in front of you with the backs of your hands together. Now roll them around so that the palms are together and thumbs are up. You will see that the right hand moved clockwise and the left hand counterclockwise. This is the direction the fingers on each hand should be moved. Thumbs are moved in the opposite direction of the fingers. When you take prints, grasp the top of the
subject's hand
to make sure that the finger to be printed is extended. The roll is a
single
movement and with only enough pressure to give a clear print. Tell the
subject to look away from the fingerprint card and to try not to "help"
the roll. This will reduce smudging and give a clean impression.
PLAIN IMPRESSIONSPlain impressions verify the order of the rolled impressions and show characteristics that are sometimes distorted in rolled prints. Plain impressions are made on the card by just pressing the four inked fingers on the card at a slight angle. They should show from the tips to one-fourth inch below the first joint. Thumbs are then printed by inking and pressing them on the block next to the plain finger impressions.Have the subject hold his fingers straight and
stiff.
The hand should be level with the wrist. Grasp the wrist with one hand
and press the fingers onto the cards with the other hand. Then allow
the
subject to clean the ink from his fingers. PROBLEM PRINTSExcessive perspiration may cause inked impressions of many persons to blur. Wipe each finger with a cloth and then quickly ink and roll it on the fingerprint card. Follow this process with each finger. You may also wipe the fingers with alcohol or other drying agent. Some people have dry, rough hands from their work. Rubbing the tips of the fingers with oil or creams can often make them soft enough for clear, un-smudged prints. If the ridges are fine and small and the skin is soft, holding ice against the fingers sometimes helps.If the hands and fingers are deformed, normal
printing
steps cannot be followed. Apply the ink directly to the fingers with a
spatula or small roller. Then rotate a square piece of paper around the
finger. When an acceptable print has been made, the square is taped to
the proper box of the fingerprint card. If there is an extra finger
(usually
a "little" finger or a thumb), the innermost five are printed as usual
on the card. The extra digit is then printed on the reverse of the
card.
Print webbed fingers as well as you can in the rolled and plain
impressions.
And if a finger or a fingertip is amputated, note that fact in the
proper
box. (Example: "AMP" 1st joint, FEB 1943 or "TIP AMP.") POSITIVE IDENTIFICATIONExperts with years of specialized training, experience
and proven ability (proficiency tested) can positively identify persons
using fingerprints by comparing various levels of detail (Levels 1, 2 and 3) present
in the known fingerprints (on file) and questioned fingerprints (of the
person just printed). Positive identification occurs when a
qualified expert determines that the questioned and known prints
contain sufficient quality (clarity) and quantity of friction ridge
detail in agreement with no unexplainable differences. Because
the skin on fingers and palms is very flexible, no two fingerprints
(even one recorded immediately after another) are exactly alike.
Fingerprint experts study for years to understand the normal variations
caused by flexible skin, by finger movement, by temporary skin damage,
and by other factors such as dirt or liquid present on a finger or
surface. Even one unexplainable difference means that the fingerprints
are not from the same person. There is no minimum number of matching points (Level 2
detail) required for positive identification because fingerprint
experts also use the actual ridge shapes (Level 3 detail) during the
identification process. Because Levels 1, 2 and 3 are used, the
amount of area required to effect an identification, such as just a
portion of one fingerprint, depends on the quality (clarity) and
quantity of friction ridge detail present in the questioned and known
prints being compared. In many situations, a tiny piece of a
fingerprint with good quality ridge detail from a crime scene may be
positively identified. At other times, the poor quality of a fax
machine copy of a complete set of ten rolled ink fingerprints may
preclude them from being identified. Positive identification of a fingerprint to a person means a qualified expert has determined the chances the fingerprint was made by someone else are so small as to be considered a practical impossibility.
TAPE
LIFT RECORD PRINTS
|

|
Why you still need the Fingerprinting
Merit
Badge Handbook
- As good as I
try to make it, this web site can
only supplement
and confirm the material in the Official Boy Scouts of America
Fingerprinting
Merit Badge Handbook. Get it... read it... and learn it. Borrow one
from
your troop library, other scouting resources, public library, or
buy one.
|
 (2008 cover)
(2008 cover)
|
 (2003 cover)
|
This site is not an official Boy Scouts of America maintained site. These pages are maintained by Ed German, a fingerprint expert with over 30 years experience with local, state and federal law enforcement laboratories in America, and more importantly a former Boy Scout and OA Member (with troops in Jacksonville and Decatur, IL), and former Assistant Scout Master for troops in Manassas, VA; Morristown, TN; Hickory, NC; and Livermore, CA. Ed German helped write the recent versions of the official Boy Scout Fingerprinting Merit Badge pamphlet (see the acknowledgments on page 32 of the 2008 edition of the pamphlet, or on page 40 of the 2003 edition, or on page 35 of the 2014 edition), but did so for free and does not earn money from pamphlet sales.
Ed was one of the counselors manning the Fingerprinting Merit Badge tent at the 1981 National Boy Scout Jamboree at Fort A.P. Hill, Virginia if you happened to be there. He has previously served as the training officer for fingerprint experts in the two-year Latent Print Examiner forensic science courses of the Illinois State Police and the United States Army.
Ed German is Certified as a Latent Print Examiner by the International Association for Identification (IAI), is Certified as a Biometrics Professional by the Institute of Electrical and Electronics Engineers (IEEE), and is a Fellow of the Chartered Society of Forensic Sciences (based in the UK). Ed retired from the US Government after more than three decades of service in the US Government.
In addition to the Illinois State Police, Ed German served in US military crime laboratories in Asia, Europe and America, and worked on six continents for the for the US Government. Ed was as a Special Agent/CW5 (the senior technical officer rank in the Army) and his military service awards include two Legion of Merit medals. As of 2020, Ed works for the sheriff's office (supporting ten law enforcement agencies) in the central Illinois hometown where he and his wife graduated high school. He also still serves as a Fingerprinting Merit Badge counselor.
This Web site does not purport to represent any official position of the U.S. Army, US Government or any other organization with which Ed German was or is affiliated.
Click here
to e-mail questions or comments to Ed German about this site.
Updated 3 August 2021